
This article is Second in series of How to Install Siebel 8.1.1.10 on Windows 8.
It explain how to create Siebel Install Images on Windows 8 using files downloaded in Part 2: Download Siebel Jar files from Oracle
Before proceeding with installation make sure you are logged in using administrator user, and latest JRE is installed if not please use: Java.com
After installing JRE, follow these steps in sequence.
Point to be noted:
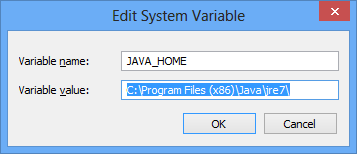
Step 1: Set JAVA_HOME environment variable. This is required to execute Siebel Image creator as all the binaries are created as jar files and OS specific installation can be created using image creator.


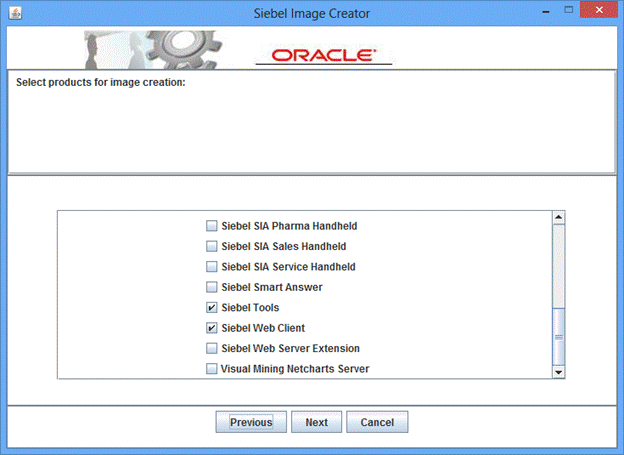
Step 5: Scroll down and select Siebel Tools and Web Client from the product list & Select Enu from the language list from the next prompt


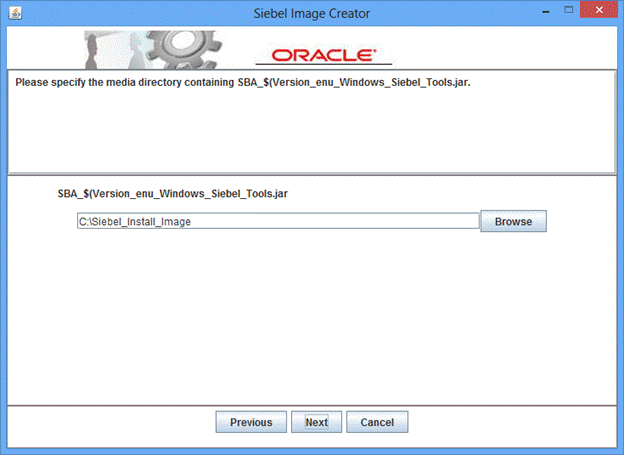
First Problem: You might run into this issue if you have extracted the jar files and image creator files in different location, Siebel Image creator tried to find for SBA_$(Version_enu_windows_Siebel_Tools.jar file.

It explain how to create Siebel Install Images on Windows 8 using files downloaded in Part 2: Download Siebel Jar files from Oracle
Before proceeding with installation make sure you are logged in using administrator user, and latest JRE is installed if not please use: Java.com
 |
| Download Java |
Point to be noted:
- Full install image need to be created for Siebel 8.1.1
- Patch Image need to be created for Siebel 8.1.1.10
- Siebel Image creator will need to be run in console mode for 8.1.1 (only 8.1.1.10 image creation is shown below).
Step 1: Set JAVA_HOME environment variable. This is required to execute Siebel Image creator as all the binaries are created as jar files and OS specific installation can be created using image creator.
 |
| Set environment variables |
Please note, you need to execute the Steps from 2 to 5 twice, once for Siebel 8.1.1 and another for Siebel 8.1.1.10
Step 2: Execute Siebel image Creator utility
 Step 3: Select create new image and Select Patch Image for 8.1.1.10 and Full Image for 8.1.1

 Step 4: Select directory to create windows installation image, and select windows as operating system.
Step 2: Execute Siebel image Creator utility


Step 5: Scroll down and select Siebel Tools and Web Client from the product list & Select Enu from the language list from the next prompt

First Problem: You might run into this issue if you have extracted the jar files and image creator files in different location, Siebel Image creator tried to find for SBA_$(Version_enu_windows_Siebel_Tools.jar file.
To avoid this issue you can either change the name of the jar file to the file requested or follow the recommended approach to copy all the files in one folder.

Once you have passed that step Siebel Install Images are created at the selected location and ready for install.

Next in series: Installing Siebel 8.1.1
No comments :
Post a Comment